Nextcloud als WebDAV-Laufwerk für große Dateien
Durch die meisten Betriebssysteme und auch den Nextcloud-Server wird die Größe der Dateien, welche per WebDAV übertragen werden können, limitiert. Das Größenlimit für Dateien, die per WebDAV übertagen werden können, liegt bei maximal 512 MB. Die einzige Möglichkeit, größere Dateien per WebDAV zu übertragen, ist diese automatisiert in Chunks zerteilt auf dem Server abzulegen. Alternativ kann der Nextcloud Desktop-Client verwendet werden. Dann werden die Dateien allerdings synchronisiert und müssen parallel noch auf dem lokalen Rechner gespeichert bleiben.
Die Software rclone bietet die Möglichkeit, Cloudspeicher als Netzlaufwerk zu mounten. Dazu werden sogenannte “Remotes” erstellt, die jeweils eine Verbindung zu einem Cloudspeicher repräsentieren. Um Dateien in mehreren Teilen auf dem Webserver abzulegen, kann neben dem “Remote”, welches die Cloud per WebDAV mountet, ein weiteres “Remote” erstellt werden, das die zerteilten Dateien im bereits erstellten WebDAV-“Remote” stückweise ablegt.
Voraussetzungen:
- Sie haben rclone in der Version 1.5 oder neuer auf einem Linux-System installiert. Falls nicht, können Sie ein entsprechendes Paket von der rclone Webseite herunterladen.
Das “Remote” in rclone einrichten
Die Einrichtung von rclone wurde bereits im Artikel “Managed Nextcloud als Backup-Storage in Linux verwenden” beschrieben. Wir gehen hier davon aus, dass bereits ein normales Nextcloud-“Remote” mit dem Namen “Nextcloud” existiert, was entsprechend diesem Artikel eingerichtet wurde.
Geben Sie den Befehl rclone config ein, um die Konfiguration von rclone zu starten.
→ rclone config
Current remotes:

Name                 Type
====                 ====
Nextcloud            webdav

e) Edit existing remote
n) New remote
d) Delete remote
r) Rename remote
c) Copy remote
s) Set configuration password
q) Quit config
e/n/d/r/c/s/q>
Wählen Sie n zur Erstellung eines neuen “Remote” und geben Sie einen Namen für das “Remote” ein, z.B. “Nextcloud-Chunked”.
e/n/d/r/c/s/q> n
name> Nextcloud-Chunked
Type of storage to configure.
Enter a string value. Press Enter for the default ("").
Choose a number from below, or type in your own value
 1 / 1Fichier
   \ "fichier"
 2 / Alias for an existing remote
   \ "alias"
 3 / Amazon Drive
   \ "amazon cloud drive"
 4 / Amazon S3 Compliant Storage Provider (AWS, Alibaba, Ceph, Digital Ocean, Dreamhost, IBM COS, Minio, etc)
   \ "s3"
 5 / Backblaze B2
   \ "b2"
 6 / Box
   \ "box"
 7 / Cache a remote
   \ "cache"
 8 / Citrix Sharefile
   \ "sharefile"
 9 / Dropbox
   \ "dropbox"
10 / Encrypt/Decrypt a remote
   \ "crypt"
11 / FTP Connection
   \ "ftp"
12 / Google Cloud Storage (this is not Google Drive)
   \ "google cloud storage"
13 / Google Drive
   \ "drive"
14 / Google Photos
   \ "google photos"
15 / Hubic
   \ "hubic"
16 / JottaCloud
   \ "jottacloud"
17 / Koofr
   \ "koofr"
18 / Local Disk
   \ "local"
19 / Mail.ru Cloud
   \ "mailru"
20 / Mega
   \ "mega"
21 / Microsoft Azure Blob Storage
   \ "azureblob"
22 / Microsoft OneDrive
   \ "onedrive"
23 / OpenDrive
   \ "opendrive"
24 / Openstack Swift (Rackspace Cloud Files, Memset Memstore, OVH)
   \ "swift"
25 / Pcloud
   \ "pcloud"
26 / Put.io
   \ "putio"
27 / QingCloud Object Storage
   \ "qingstor"
28 / SSH/SFTP Connection
   \ "sftp"
29 / Transparently chunk/split large files
   \ "chunker"
30 / Union merges the contents of several remotes
   \ "union"
31 / Webdav
   \ "webdav"
32 / Yandex Disk
   \ "yandex"
33 / http Connection
   \ "http"
34 / premiumize.me
   \ "premiumizeme"
Storage>
Wählen Sie als Typ chunker.
Storage> chunker
** See help for chunker backend at: https://rclone.org/chunker/ **

"Remote" to chunk/unchunk.
Normally should contain a ':' and a path, eg "myremote:path/to/dir",
"myremote:bucket" or maybe "myremote:" (not recommended).
Enter a string value. Press Enter for the default ("").
remote>
Geben Sie hier das “Remote” an, in dem die Chunks des neuen Remotes abgelegt werden sollen. In unserem Fall ist das unser “Remote” Nextcloud:. Der Doppelpunkt am Ende ist wichtig, damit das “Remote” als solches erkannt wird. Ansonsten wird ein lokales Verzeichnis verwendet.
remote> Nextcloud:
Files larger than chunk size will be split in chunks.
Enter a size with suffix k,M,G,T. Press Enter for the default ("2G").
chunk_size>
Die maximal mögliche Größe der Chunks ist 512 MB. Wählen Sie in diesem Schritt also bitte 512M, um nicht unnötig viele Chunks zu erzeugen.
chunk_size> 512M
Choose how chunker handles hash sums. All modes but "none" require metadata.
Enter a string value. Press Enter for the default ("md5").
Choose a number from below, or type in your own value
 1 / Pass any hash supported by wrapped remote for non-chunked files, return nothing otherwise
   \ "none"
 2 / MD5 for composite files
   \ "md5"
 3 / SHA1 for composite files
   \ "sha1"
 4 / MD5 for all files
   \ "md5all"
 5 / SHA1 for all files
   \ "sha1all"
 6 / Copying a file to chunker will request MD5 from the source falling back to SHA1 if unsupported
   \ "md5quick"
 7 / Similar to "md5quick" but prefers SHA1 over MD5
   \ "sha1quick"
hash_type>
Als Hash-Algorithmus empfiehlt es sich, den SHA1-Alogrithmus zu verwenden, der etwas sicherer ist als MD5.
hash_type> sha1
Edit advanced config? (y/n)
y) Yes
n) No
y/n>
Das Bearbeiten der erweiterten Konfiguration ist nicht nötig.
y/n> n
Remote config
--------------------
[Nextcloud-Chunked]
type = chunker
remote = Nextcloud:
chunk_size = 512M
hash_type = sha1
--------------------
y) Yes this is OK
e) Edit this remote
d) Delete this remote
y/e/d>
Bestätigen Sie mit y.
y/e/d> y
Current remotes:

Name                 Type
====                 ====
Nextcloud            webdav
Nextcloud-Chunked    chunker

e) Edit existing remote
n) New remote
d) Delete remote
r) Rename remote
c) Copy remote
s) Set configuration password
q) Quit config
e/n/d/r/c/s/q>
Wählen Sie q, um den Dialog zu verlassen.
e/n/d/r/c/s/q> q
Das “Remote” einhängen
Nachdem das “Remote” konfiguriert wurde, muss dieses noch in das Dateisystem eingehängt werden, um es zu verwenden. Erstellen Sie dazu das Verzeichnis, unter welchem das “Remote” eingehängt werden soll, also z.B.
mkdir -p ~/mnt/nextcloud-chunked
und hängen Sie das “Remote” anschließend ein:
rclone mount Nextcloud-Chunked:/ ~/mnt/nextcloud-chunked
Solange rclone mount ausgeführt wird, ist das “Remote” eingehängt. Sobald der Befehl mit der Tastenkombination Strg + C beendet wird, wird das “Remote” ausgehängt.
Test
Nun können Sie testweise eine große Datei in das Remote kopieren, um zu prüfen, ob diese korrekt abgelegt wird. Wir haben z.B. testweise eine 3,6 GB große ISO-Datei namens debian-10.2.0-amd64-DVD-1.iso im Remote abgelegt. Im Webinterface der Cloud tauchen die gechunkten Dateien auf:
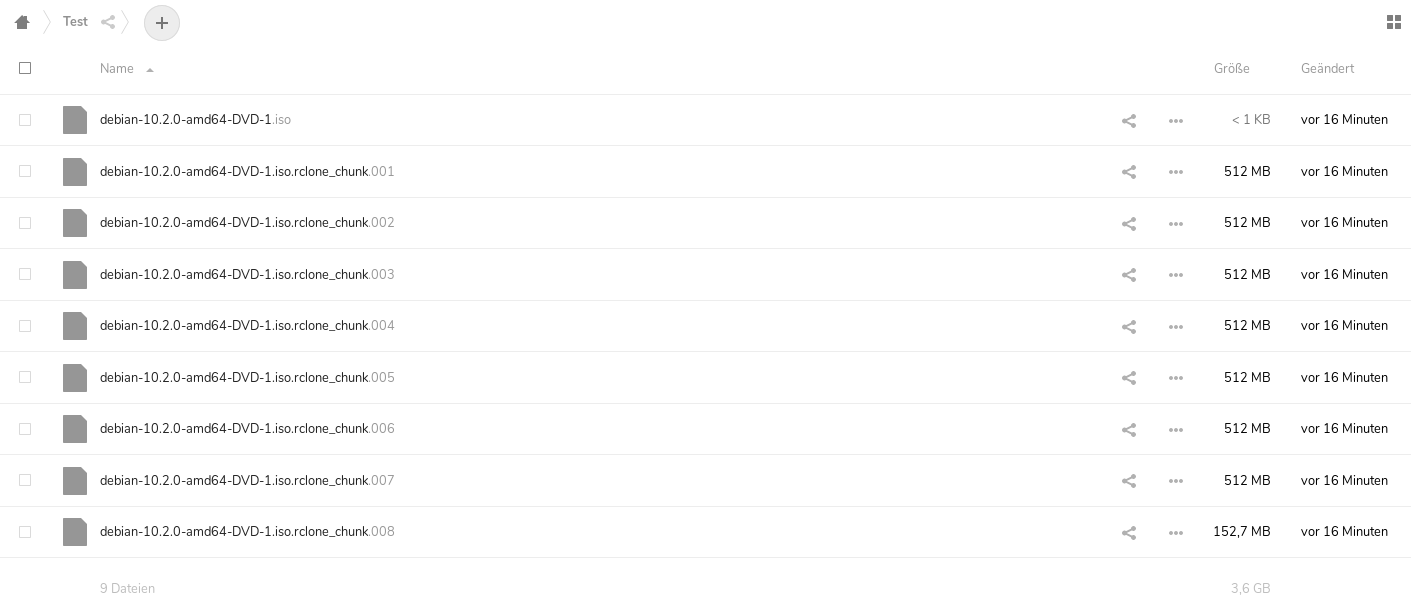
Unter dem eigentlichen Namen der Datei debian-10.2.0-amd64-DVD-1.iso findet man in der Cloud nur eine Dummy-Datei mit Meta-Informationen. Auf dem lokal eingehängten Remote wird im Verzeichnis nur die dorthin kopierte Datei angezeigt.